Set Device Discovery and Polling
Device properties and status are retrieved from WfH device within a specified time interval. You can configure the setting in Work From Home Polling screen in SLNX Admin tool. To set the polling interval and discovery, follow the steps below:
-
Login to the Management Console.
-
Click [Discovery & Polling] ⟶[Work from Home] ⟶[Polling].
-
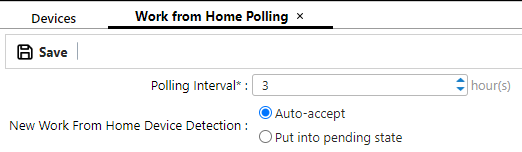
Set the Polling Interval and select an option for New Work From Home Device Detection.
Item
Description
Polling Interval
The interval will be used by WfH Client service to poll device information such as status and counters. After polling, the information is reflected in the WfH device properties if the device state is accepted.
The default value is 3 hours, but you can set a minimum of 1 hour and maximum of 24 hours.
New Work From Home Device Detection
This setting determines the status of the newly detected WfH device. There two modes available:
-
Auto-accept: If selected, all new devices reported by a WfH Client will be automatically added as a tracked device and be in the “Accepted” state. This is the default mode.
-
Put into pending state: When this mode is selected, all new devices will be put into “Pending” state and will not be tracked. The Administrator will have to manually accept the devices in the WfH tab. To do this, you can refer to Change a Device’s WfH State.
-
-
Assign SNMP Access profiles.
The assigned SNMP profiles will be used to collect counters and status information from WfH devices. Assigned SNMP accounts will be matched to device based on priority.
For more information about SNMP Accounts, refer to SNMP.
To assign an SNMP profile, select a profile from the Not Assigned Accounts list, and then click the Up arrow to move it to the Assigned Account list.
Optionally, you can select the SNMP Profile in Assigned Accounts pane and click arrow up and down to set the account’s order of priority.
For the list of SNMP Profiles, click [Discovery & Polling] ⟶[Access Polling] ⟶ [SNMP].
-
Click Save.